Most common certificate operations (except enrollment![]() Certificate enrollment refers to the process by which a user requests a digital certificate. The user must submit the request to a certificate authority (CA).) are available on the Certificate Search grid. The actions available on the grid header include: Edit (users with read-only permissions will see Display instead), Delete, Revoke, Edit All, Revoke All, Delete All (for collections only), and Get CSV. Secondary operations are shown on the context menu, accessed by right-clicking on a selected row on the Certificate Search grid. The context menu includes Edit (or Display), Delete, Delete Private Key, Revoke, Download, Add to Certificate Store, Remove from Certificate Store, Renew, and Identity Audit. There is also an operation to place a hold, or remove a hold, on a certificate, which is available from the Revoke operation through the Revocation Reason: Certificate Hold/Remove From Hold. When selecting multiple rows, only the operations Edit, Delete, Revoke and Delete Private Key
Certificate enrollment refers to the process by which a user requests a digital certificate. The user must submit the request to a certificate authority (CA).) are available on the Certificate Search grid. The actions available on the grid header include: Edit (users with read-only permissions will see Display instead), Delete, Revoke, Edit All, Revoke All, Delete All (for collections only), and Get CSV. Secondary operations are shown on the context menu, accessed by right-clicking on a selected row on the Certificate Search grid. The context menu includes Edit (or Display), Delete, Delete Private Key, Revoke, Download, Add to Certificate Store, Remove from Certificate Store, Renew, and Identity Audit. There is also an operation to place a hold, or remove a hold, on a certificate, which is available from the Revoke operation through the Revocation Reason: Certificate Hold/Remove From Hold. When selecting multiple rows, only the operations Edit, Delete, Revoke and Delete Private Key![]() Private keys are used in cryptography (symmetric and asymmetric) to encrypt or sign content. In asymmetric cryptography, they are used together in a key pair with a public key. The private or secret key is retained by the key's creator, making it highly secure. (only if the private key is stored in the database) are enabled on the grid header and the context menu. For the edit commands, the only details that can be edited are the metadata
Private keys are used in cryptography (symmetric and asymmetric) to encrypt or sign content. In asymmetric cryptography, they are used together in a key pair with a public key. The private or secret key is retained by the key's creator, making it highly secure. (only if the private key is stored in the database) are enabled on the grid header and the context menu. For the edit commands, the only details that can be edited are the metadata![]() Metadata provides information about a piece of data. It is used to summarize basic information about data, which can make working with the data easier. In the context of Keyfactor Command, the certificate metadata feature allows you to create custom metadata fields that allow you to tag certificates with tracking information about certificates. fields.
Metadata provides information about a piece of data. It is used to summarize basic information about data, which can make working with the data easier. In the context of Keyfactor Command, the certificate metadata feature allows you to create custom metadata fields that allow you to tag certificates with tracking information about certificates. fields.
Full descriptions of the available certificate operations are below.
 Add to Certificate Store
Before adding a certificate to a certificate store in Keyfactor Command, you must approve an orchestrator![]() Keyfactor orchestrators perform a variety of functions, including managing certificate stores and SSH key stores. to handle the store and create a record for the store in Keyfactor Command. See Orchestrator Management and Certificate Store Operations.
Keyfactor orchestrators perform a variety of functions, including managing certificate stores and SSH key stores. to handle the store and create a record for the store in Keyfactor Command. See Orchestrator Management and Certificate Store Operations.
Permissions for certificates and certificate stores can be set at either the global or certificate collection![]() The certificate search function allows you to query the Keyfactor Command database for certificates from any available source based on any criteria of the certificates and save the results as a collection that will be availble in other places in the Management Portal (e.g. expiration alerts and certain reports). and certificate store container level. See Certificate Collection Permissions and Container Permissions for more information about global vs collection and container permissions.
The certificate search function allows you to query the Keyfactor Command database for certificates from any available source based on any criteria of the certificates and save the results as a collection that will be availble in other places in the Management Portal (e.g. expiration alerts and certain reports). and certificate store container level. See Certificate Collection Permissions and Container Permissions for more information about global vs collection and container permissions.
To add a certificate to a certificate store:
- Highlight the row in the results grid and right-click.
- Choose Add to a Certificate Store from the right-click menu.
-
When you select the Add to Certificate Store option the Select Certificate Store Locations dialog opens. When you select the certificate stores to which you want to deploy your certificate and click Include, the Add to Certificate Stores dialog appears BEHIND the Select Certificate Store Locations dialog, holding your selection and leaving the Select Certificate Store Locations dialog open for you to continue selecting locations. The final list of selections will only be accessible once you close the Select Certificate Store Locations dialog using the Include and Close button.
 Select Certificate Store Locations
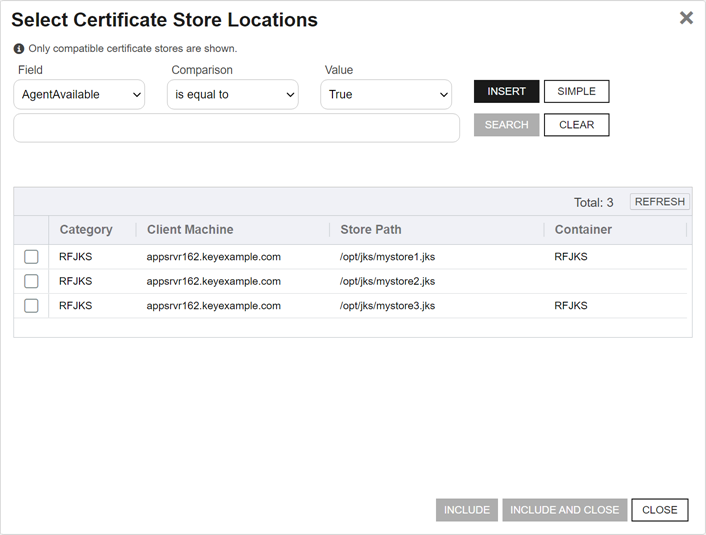
The Select Certificate Store Locations dialog allows you to run queries against your certificate store list to select which store(s) to deploy a selected certificate to. Check the box next to each certificate store location to which you want to distribute the certificate.
Note: Only compatible certificate stores and only stores in containers to which you have permissions are shown on the grid.Tip: You may change the search results by using the search fields at the top of the dialog. All of the Keyfactor Command grid search features are available to assist your search. See Using the Certificate Store Search Feature for more information on the available search fields. The default search criteria is AgentAvailable is equal to True.The actions on the Select Certificate Store Locations dialog are:
-
Include
Click this to add the selected certificate store(s) to your certificate selection and leave the search dialog open for further searches.
-
Include and Close
Click this to close the search dialog and add the selected certificate store(s) to your certificate selection, which will then be displayed and ready for updates as per the instructions in Add to Certificate Stores.
-
Close
Click this to cancel the operation and return to the main page with no certificate stores selected.
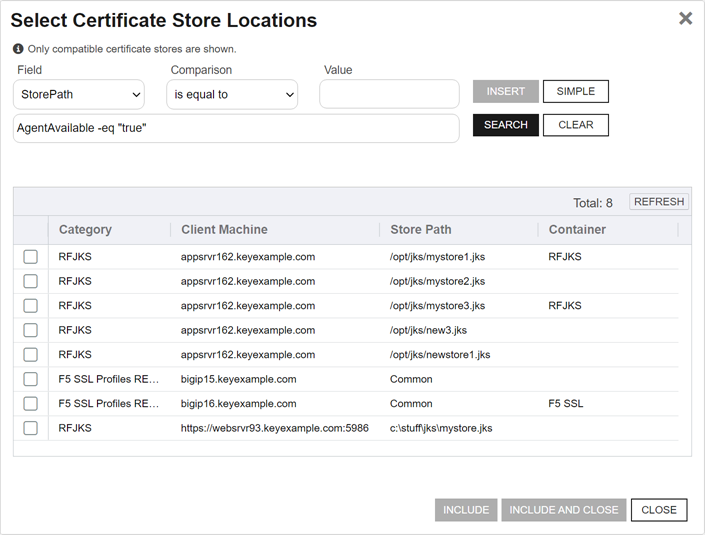
Figure 32: Select Certificate Store Locations Dialog
 Add to Certificate Stores
The Add to Certificate Stores page appears once you select at least one certificate store to distribute your certificate to. It includes a grid section with a series of tabs that display a tab for each type of certificate store selected with a list of the selected stores under each tab. The header section of the dialog shows global options that apply to the add job as a whole:
-
Include Certificate Stores
You may return to the Select Certificate Store Locations dialog by clicking Include Certificate Stores above the grid. The current selections will be retained.
-
Schedule when to run the job for the certificate store
In the Schedule dropdown, select a time at which the job to add the certificate to the stores should run. The choices are Immediate or Exactly Once at a specified date and time. If you choose Exactly Once, enter the date and time for the job. A job scheduled for Immediate running will run within a few minutes of saving the operation. The default is Immediate.
-
Include Private Key on Certificate Stores when the Private Key is optional
Check the Include Private Key box if you want to deliver the private key of the certificate to any selected certificate stores that do not require a private key (e.g. Java keystores). This option only appears for certificates that have a private key available for distribution.
Click Remove at the top of the grid to remove the selected certificate store from the page. The certificate will not be added to the store.
For each selected certificate store you can apply the following actions:
-
Overwrite
Check Overwrite below the grid to overwrite any existing certificate in the same location and with the same name or alias for the selected certificate store type.
-
Alias
Add an Alias below the grid, if applicable, for the certificate store type. See the Information Required by Certificate Store section, below, for more information.
Note: The tab heading of the certificate location will display an alert if an alias is required for the location. If Supports Custom Alias is set to Forbidden on the certificate store type, the Alias field will not display unless Overwrite is checked on this page.
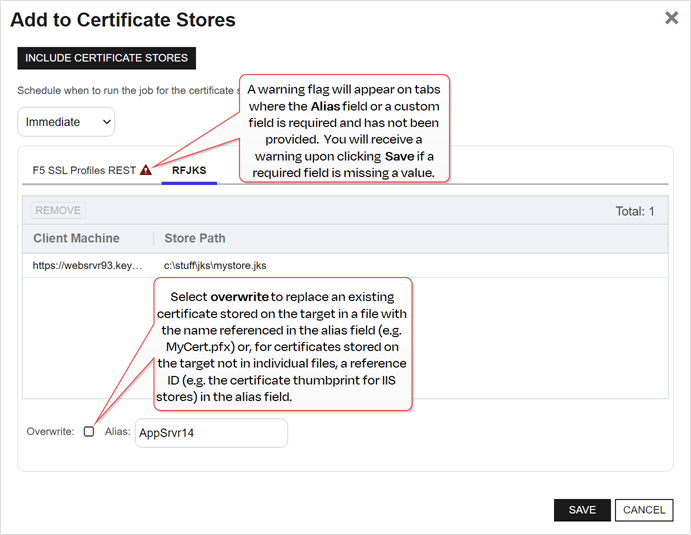
Figure 33: Add Certificate—Install into Certificate Locations

Figure 34: Alias Required Alert on Save
 Information Required by Certificate Stores
Each type of certificate store has different requirements for providing an alias or other additional information.
The certificate store type fields that are relevant to certificate store use are:
-
Supports Entry Password
If your certificate store type has this enabled, you will have the option to enter a password for the certificate entry in the certificate store on the addition of an entry into the certificate store.
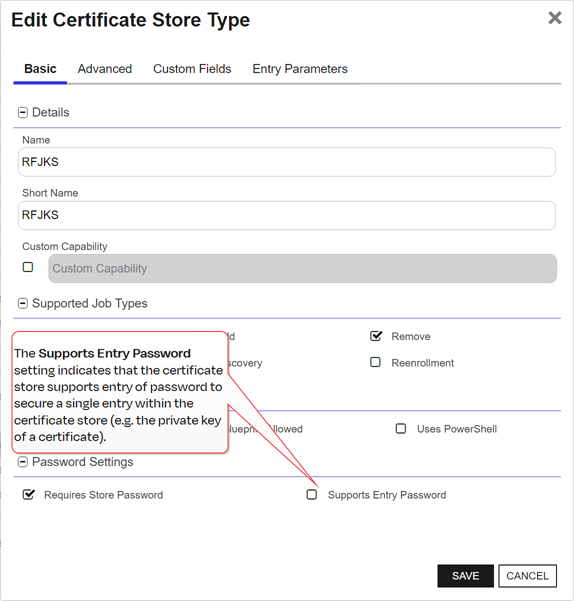
Figure 35: Certificate Store Type Configuration: Basic Tab
-
Supports Custom Alias
A value of Required indicates that a custom alias will be required when a certificate is added to a certificate store. Optional indicates an alias can be associated with the entry if desired. If your certificate store type sets this to Forbidden, the Alias field will not display when adding a certificate to a certificate store unless Overwrite is checked on the add page. In this case, you’re not associating an alias with the certificate you’re adding to the store but rather specifying the alias of the certificate already in the store that you wish to replace (in function) with the new certificate you’re adding.
The format of custom alias values varies depending on the certificate store type. In many cases, the alias is the thumbprint of the certificate. In some cases, it’s the file name of the certificate file or a custom alias provided at the time the certificate was added to the certificate store. For instance:
-
For an Amazon Web Services (AWS) store, the alias is the internal ID assigned by Amazon (the Amazon resource number or ARN). Provide the entire contents of the Alias/IP from this field when entering an alias for overwrite. For example:
arn:aws:acm:us-west-2:220531701668:certificate/88e5dcfb-a70b-4636-a8ab-e85e8ad88780 -
For F5 stores using the Keyfactor custom-built F5 Certificate Store Manager extension (see Installing Custom-Built Extensions), the alias is the file name used to store the file in the device file system, minus the extension (e.g. use alias MyFile for a file named MyFile.crt). Aliases should be entered without spaces. Note that certificate names are case sensitive.
Note: Keyfactor Command will automatically strip out any spaces between the octets in thumbprints in the alias field, so it does not matter whether you enter the thumbprint with or without spaces.Tip: When adding a certificate to a certificate store, you have the option to overwrite an existing certificate with the current certificate. If you choose this option, you will need to provide the alias of the certificate you wish to overwrite. Find the alias values by navigating to Management Portal > Certificates > Certificate Search. Select the certificate you wish to overwrite and double-click, or click Edit, from the grid header or right-click menu. Choose the Locations tab and double-click on the Location Type (this must have a number other than zero in the Count column) to open the details dialog. The Alias field holds the information that may be required for an overwrite.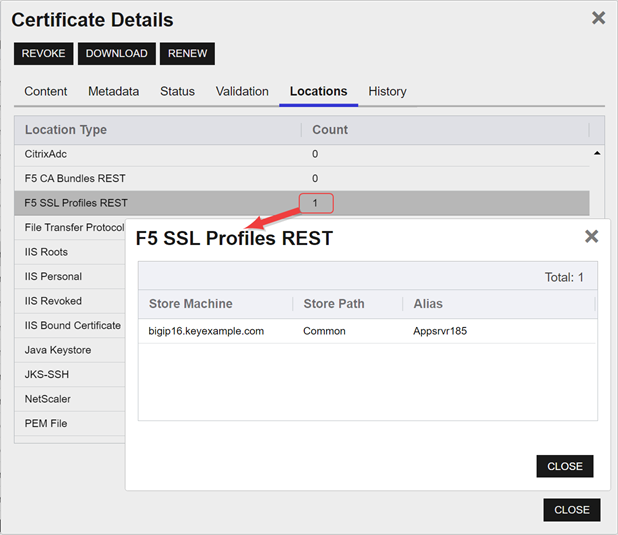
Figure 36: Example: Certificate Location Details for a JKS Location
-
-
Private Key Handling
When adding a certificate to a certificate store, if you select a certificate that does not have an associated private key, certificate stores with this option set to Required will not appear as available stores to which the certificate can be added. If this option is set to Forbidden and the selected certificate has a private key, the private key will be ignored and only the public key
 In asymmetric cryptography, public keys are used together in a key pair with a private key. The private key is retained by the key's creator while the public key is widely distributed to any user or target needing to interact with the holder of the private key. will be delivered to the target.Note: Private keys are always available in PFX Enrollment.
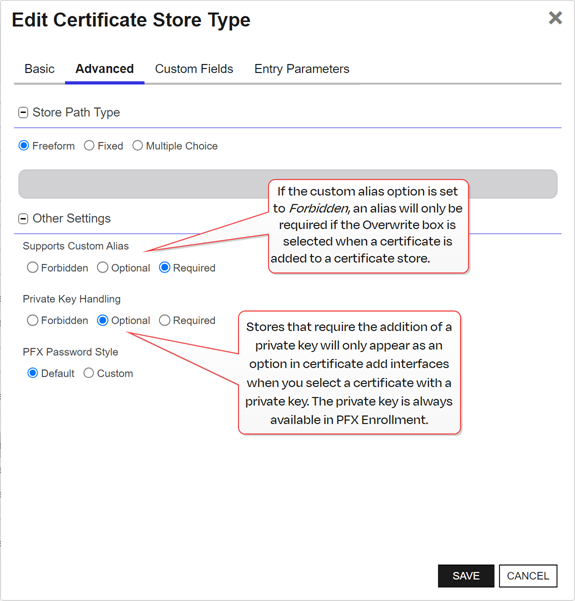
Figure 37: Certificate Store Type Configuration: Advanced Tab
-
Entry Parameters
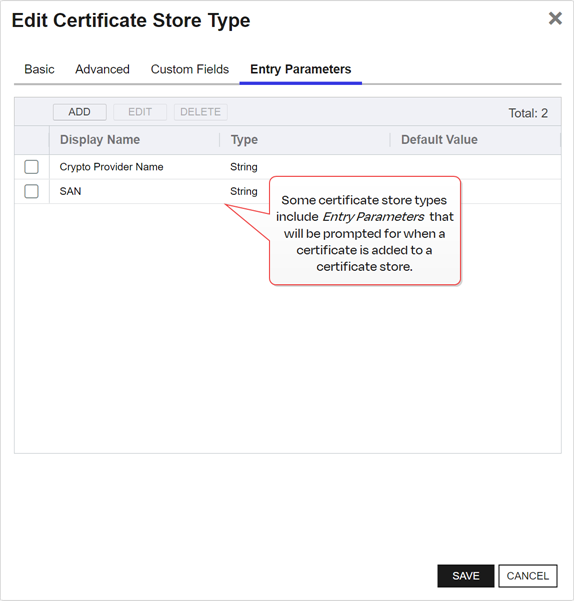
Not all certificate store types will have entry parameters. The ones shown in Figure 38: Certificate Store Type Configuration: Entry Parameters Tab are for the custom Windows Certificate type for the Keyfactor custom-built IIS Certificate Store Manager extension (see Installing Custom-Built Extensions).
-
- Click Save to submit the certificate store additions.
 Delete
Select one or more certificates in the results grid and then click Delete at the top of the grid or Delete in the right-click menu to remove the selected certificate(s) from the Keyfactor Command database. If the selected certificates have associated private keys stored in the database, these private keys are also removed. The certificates will be returned to the Keyfactor Command database on the next full synchronization if synchronization for the certificate source (certificate authority![]() A certificate authority (CA) is an entity that issues digital certificates. Within Keyfactor Command, a CA may be a Microsoft CA or a Keyfactor gateway to a cloud-based or remote CA., SSL
A certificate authority (CA) is an entity that issues digital certificates. Within Keyfactor Command, a CA may be a Microsoft CA or a Keyfactor gateway to a cloud-based or remote CA., SSL![]() TLS (Transport Layer Security) and its predecessor SSL (Secure Sockets Layer) are protocols for establishing authenticated and encrypted links between networked computers. endpoint
TLS (Transport Layer Security) and its predecessor SSL (Secure Sockets Layer) are protocols for establishing authenticated and encrypted links between networked computers. endpoint![]() An endpoint is a URL that enables the API to gain access to resources on a server., etc.) is still configured. Certificate history and private keys do not return when certificates re-synchronize.
An endpoint is a URL that enables the API to gain access to resources on a server., etc.) is still configured. Certificate history and private keys do not return when certificates re-synchronize.
Whenever a certificate is deleted that is a part of a certificate renewal chain. The certificates on either end of the deleted cert(s) will have their certificate histories updated to show that either a certificate before or after the certificate was deleted in the renewal chain of that certificate.
Permissions for certificates can be set at either the global or certificate collection level. See Certificate Collection Permissions for more information about global vs collection permissions.
 Delete All
This option is available only in saved collections, not in standard certificate searches. Click the Delete All action button at the top of the collection grid. The button appears active only if no certificates are selected on the grid. A large deletion may take several minutes to complete. The certificates will be returned to the Keyfactor Command database on the next full synchronization if synchronization for the certificate source (certificate authority, SSL endpoint, etc.) is still configured.
Permissions for certificates can be set at either the global or certificate collection level. See Certificate Collection Permissions for more information about global vs collection permissions.
 Delete Private Key
Click the Delete Private Key in the right-click menu to remove the private key of the selected certificate(s) from the Keyfactor Command database. This option is only available if the private key is stored in the database.
Permissions for certificates can be set at either the global or certificate collection level. See Certificate Collection Permissions for more information about global vs collection permissions.
 Download
Click Downland in the right-click menu to download the selected certificate to the local computer with or without a private key. Only one certificate may be downloaded at a time.
To download a certificate without a private key.
For users who will be downloading certificates with private keys.
Permissions for certificates can be set at either the global or certificate collection level. See Certificate Collection Permissions for more information about global vs collection permissions.
You will be able to download a certificate including its private key if one of the following is true:
- The certificate has been stored in the Keyfactor Command database with its private key.
-
The certificate was issued using a template
 A certificate template defines the policies and rules that a CA uses when a request for a certificate is received. that had key archival enabled, issued from a Microsoft CA
 A certificate authority (CA) is an entity that issues digital certificates. Within Keyfactor Command, a CA may be a Microsoft CA or a Keyfactor gateway to a cloud-based or remote CA. that has a valid Key Recovery Agent certificate, and that Key Recovery Agent certificate is configured on the Keyfactor Command server.Tip: CA-level key recovery is supported for Microsoft CAs to allow recovery of private keys for certificates enrolled outside of Keyfactor Command. CA-level key archiving is not supported for enrollments done through Keyfactor Command. CA-level key recovery is not supported for EJBCA CAs. For enrollments done through Keyfactor Command for either Microsoft or EJBCA CAs, use Keyfactor Command private key retention (see Details Tab).
To download a certificate that has the private key stored in the Keyfactor Command database:
- Highlight the row in the results grid and right-click.
-
Choose Download from the right-click menu, or the action button on the Certificate Details dialog.
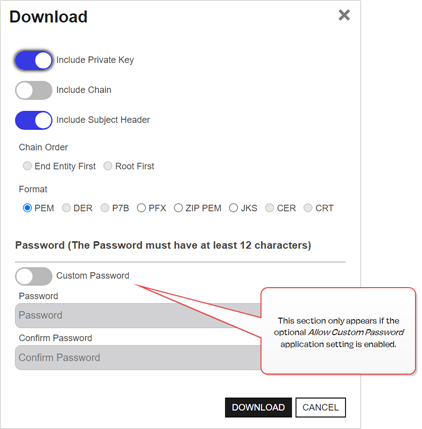
Figure 39: Certificate Operation: Download Certificate with Private Key
-
In the Download dialog, select the Include Private Key option to include the private key of the certificate in the download. The Include Private Key option is supported for PEM
 A PEM format certificate file is a base64-encoded certificate. Since it's presented in ASCII, you can open it in any text editor. PEM certificates always begin and end with entries like ---- BEGIN CERTIFICATE---- and ----END CERTIFICATE----. PEM certificates can contain a single certificate or a full certifiate chain and may contain a private key. Usually, extensions of .cer and .crt are certificate files with no private key, .key is a separate private key file, and .pem is both a certificate and private key., ZIP PEM, PFX and JKS
 A Java KeyStore (JKS) is a file containing security certificates with matching private keys. They are often used by Java-based applications for authentication and encryption. outputs.Note: If you choose Include Private Key and you have the Allow Custom Password application setting configured to False (see Application Settings: Enrollment Tab), after you click Download (step 7, below), a PFX/PEM/JKS Password dialog will pop-up with the one-time password and action buttons to Copy Password or Close the pop-up. Clicking Copy Password will copy the password to the clipboard. As a security measure, the dialogue will close after 2 minutes. To secure the downloaded file, you will need this password in order to access the PFX, PEM, or JKS file generated by the download. Click Close to close the PFX/PEM/JKS Password dialog once you have copied the password.
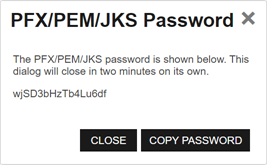
Figure 40: Certificate Operation: Password for Certificate with Private Key
Important: The randomly generated password cannot be regenerated, so it must be copied prior to closing the dialog. - Toggle Include Chain to include the certificate chain (root and intermediate certificates) in the download, if required. The Include Chain option is supported for PEM, ZIP PEM, PFX, and JKS outputs.
- Toggle Use Legacy Encryption to encrypt the downloaded file using the historical algorithm (3DES/SHA1/RC2). If this option is toggled to Off, the newer algorithm set provided by Windows (AES256/SHA256/AES256) is used instead. This option applies only to certificates downloaded in PFX format. The default for the PFX enrollment page can be set with the Use Legacy Encryption application setting (see Application Settings: Enrollment Tab).
-
If you have enabled the Allow Cryptographic Service Providers (CSPs) application setting (see Application Settings: Enrollment Tab), you will see a Target CSP dropdown when a format of PFX is selected. Select a value if appropriate in your environment. This is not used in most environments.
- If you selected Include Chain, select a Chain Order for the certificates in the resulting output file—either End Entity First (at the beginning of the file) or Root First. Chain Order is supported for all outputs. PFX output always includes the end entity certificate first.
- he Include Subject Header option is only enabled and displayed when PEM format is selected. When toggled Off, the first line in the PEM file that contains the certificates subject information is removed. When toggled On, the first line in the PEM file that contains the certificates subject information is included. The default is On. This works with the Include Chain option where it will remove the subject header, when set to Off, for each of the certificates returned in the chain. It also works with Include Private Key option enabled.
-
Chose an encoding format. Available options will depend on choices made above and may include: PEM, DER
 A DER format certificate file is a DER-encoded binary certificate. It contains a single certificate and does not support storage of private keys. It sometimes has an extension of .der but is often seen with .cer or .crt., P7B
 A PKCS #7 format certificate file is a base64-encoded certificate. Since it's presented in ASCII, you can open it in any text editor. PKCS #7 certificates always begin and end with entries that look something like ---- BEGIN CERTIFICATE---- and ----END CERTIFICATE----. Unlike PEM files, PKCS #7 files can contain only a certificate and its certifiate chain but NOT its private key. Extensions of .p7b or .p7c are usually seen on certificate files of this format., PFX, ZIP PEM, JKS, CER, or CRT.Note: Selecting the Include Private Key and Include Chain options changes which formats are available. Unavailable options will have their button grayed-out.
 -
If enabled, in the Password section of the page, check the Custom Password box if desired and enter and confirm a custom password to use in securing the downloaded file. This section only appears if Include Private Key is toggled on and if the Allow Custom Password application setting is set to True. The value in the Password Length field in application settings is shown for guidance when entering a password. For more information about both of these application settings, see Application Settings: Enrollment Tab.
- Click Download to begin the download.
To download a certificate that does not have the private key stored in the Keyfactor Command database:
- Highlight the row in the results grid and right-click.
-
Choose Download from the right-click menu.
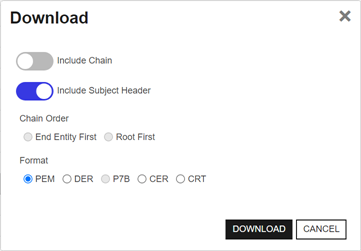
Figure 41: Certificate Operation: Download Certificate without Private Key
-
Chose Include Chain to include the certificate chain (root and intermediate certificates) in the download, if required. Include Chain is supported for PEM and P7B outputs.
Note: Selecting the Include Chain option changes which formats are available for the selections in the next steps. - Toggle Include Subject Header If you want to include -BEGIN CERTIFICATE REQUEST- and -END CERTIFICATE REQUEST- with the download file. Include Subject Header is supported for PEM, P7B, CER, and CRT outputs.
- If you selected Include Chain, select a Chain Order for the certificates in the resulting output file—either End Entity First (at the beginning of the file) or Root First. Chain Order is supported for PEM and P7B outputs.
- Chose an encoding format. Available options will depend on choices made above and may include: PEM, DER, P7B, CER, or CRT.
- Click Download to begin the download.
 Edit (Display)
Select one certificate in the results grid and then click Edit at the top of the grid, or Edit in the right-click menu, or double-click the row, to pop up the certificate details dialog box in which you can view details of the certificate data and edit owner and metadata fields for the certificate. Users without Edit Metadata permissions to certificates will see a Display option instead of an Edit option.
For more information regarding the data displayed on the certificate details dialog, see Certificate Details.
The Change Owner permission is only needed for users who will be modifying the Owner Role Name on the Status tab for certificates. Users with Read permissions may view the existing owner.
The Metadata Modify permission is only needed for users who will be modifying the values of metadata fields for certificates. Users with Read permissions may view the existing metadata values.
The Read permission for Certificate Store Management is only needed for users who will be viewing values on the Locations tab.
Permissions for certificates and certificate stores can be set at either the global or certificate collection and certificate store container level. You can use a mixture with, for example, global certificate permissions and container-level certificate store permissions. See Certificate Collection Permissions and Container Permissions for more information about global vs collection and container permissions.
Note, the certificate details dialog also includes buttons for the Download (see Download), Revoke (see Revoke), Renew (see Renew), and Change Owner (see Change Owner) operations (as applicable) for users with appropriate permissions. You cannot change any of the certificate attributes from Certificate Authority (shown on the Content tab) or any of the certificate status, validation, locations, or history data tracked by Keyfactor Command (shown on the Status, Validation, Locations and History tabs) other than the certificate owner modified with Change Owner.
See Certificate Details for more detailed information about the certificate details dialog.
If you select multiple certificates to edit at once, only the metadata fields dialog will appear. See Edit All.
 Edit All
Click Edit All at the top of the grid to open the metadata fields for all of the certificates in the query for editing. The button appears active only if no certificates are selected on the grid. All defined metadata fields—including those marked hidden—appear on the Edit All dialog. Each field includes an alert button that identifies whether the certificates in the query have all of same (![]() ) or different (
) or different (![]() ) values for each metadata field. Click the alert button for an explanation of the impact the Overwrite settings for this field will have on the certificates.
) values for each metadata field. Click the alert button for an explanation of the impact the Overwrite settings for this field will have on the certificates.
See Metadata Tab for more detailed information about the certificate details metadata.
Click Allow Modifying to enable the field for editing. Editing a field and selecting Overwrite will change the value for all certificates. Editing this field and not selecting Overwrite will only change the value for certificates that do not already have a value defined for this field.
Permissions for certificates can be set at either the global or certificate collection level. See Certificate Collection Permissions for more information about global vs collection permissions.
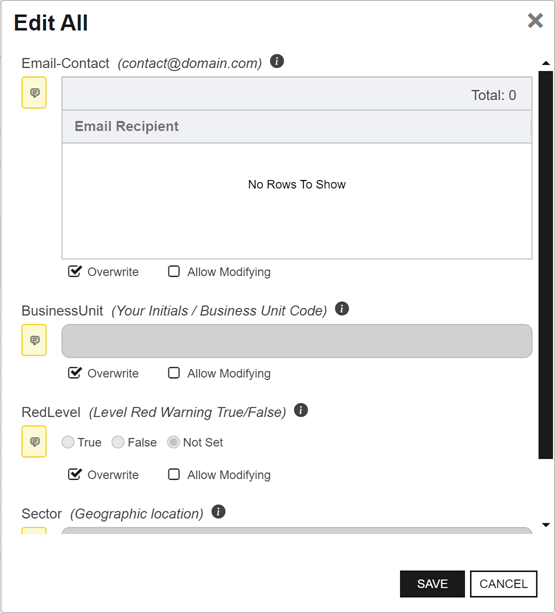
Figure 42: Certificate Operation: Edit All
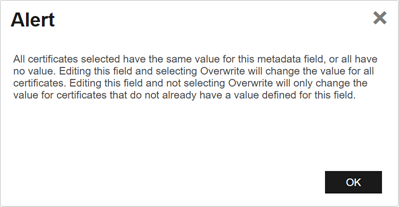
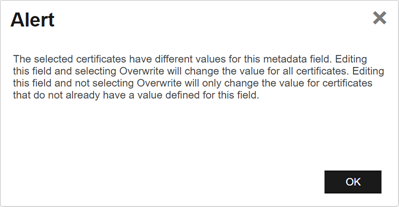
Figure 43:Certificate Operation: Edit All Alerts
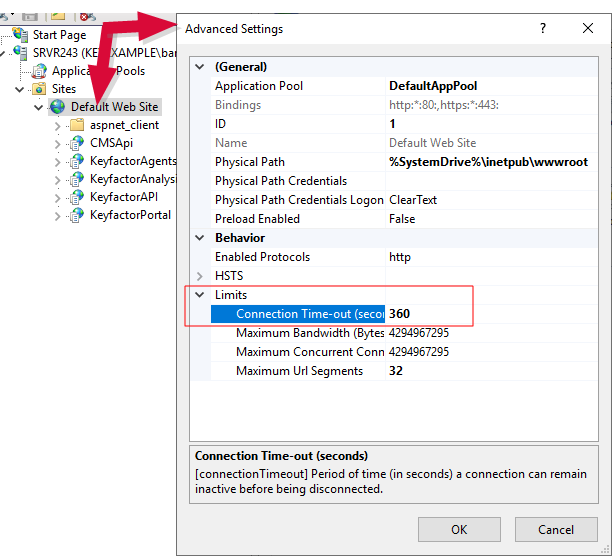
Figure 44: IIS Setting for 1+ Million Records - Certificate Operation: Edit All
 Get CSV
Click Get CSV from the top of the grid to download all the certificates in the results grid to a comma-delimited CSV file. The button appears active only if no certificates are selected on the grid.
Permissions for certificates can be set at either the global or certificate collection level. See Certificate Collection Permissions for more information about global vs collection permissions.
The CSV file will contain the following information for each exported certificate:
- Issued DN
 A distinguished name (DN) is the name that uniquely identifies an object in a directory. In the context of Keyfactor Command, this directory is generally Active Directory. A DN is made up of attribute=value pairs, separated by commas. Any of the attributes defined in the directory schema can be used to make up a DN.
 - Import Date
- Effective Date
- Expiration Date
- Issued CN
- Certificate Authority Name
- Template Display Name
- Principal
- Requester
- Key Type
 The key type identifies the type of key to create when creating a symmetric or asymmetric key. It references the signing algorithm and often key size (e.g. AES-256, RSA-2048, Ed25519).
- Key Size
 The key size or key length is the number of bits in a key used by a cryptographic algorithm.
- Certificate State
- Thumbprint
- Serial Number
A confirmation dialog will pop up providing an approximate file size of the file that will be generated. A CSV file generated from a very large result set may take a long time to download or may be unwieldy to edit.
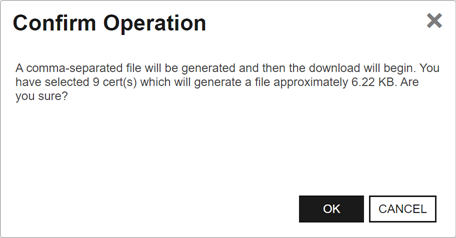
Figure 45: Certificate Operation: CSV Download
 Change Owner
Click Change Owner at the top of the Certificate Details dialog (see Edit (Display)) for the certificate on which you wish to change owner. On the Status tab you can view the current certificate owner in the Owner Role Name field. The optional certificate owner is a security role defined in Keyfactor Command (see Security Roles and Claims). If the user assigning the new owner is an administrator, the Change Certificate Owner dialog will offer a search select field in which to enter the new certificate owner. To narrow the list of results in the search select field, begin typing a search string in the search field. If the user assigning the new owner is a limited access user, the Change Certificate Owner dialog will offer a dropdown to select the new owner. Only security roles of which the user is a member will appear in the dropdown.
Permissions for certificates can be set at either the global or certificate collection level. See Certificate Collection Permissions for more information about global vs collection permissions.
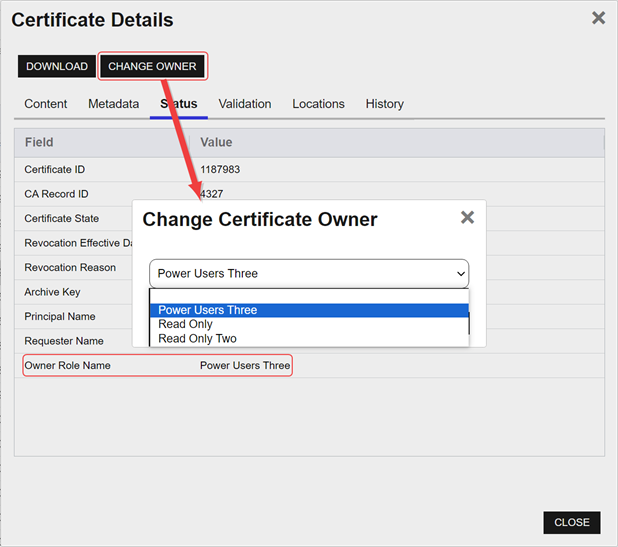
Figure 46: Certificate Operation: Change Owner as a Limited Access User
 Identity Permissions
Click Identity Permissions in the right-click menu to view the certificate level permissions (read, edit metadata, download with private key, revoke, and delete) granted to all user roles defined in Keyfactor Command (see Security Roles and Claims) for the selected certificate.
Permissions for certificates can be set at either the global or certificate collection level. See Certificate Collection Permissions for more information about global vs collection permissions.
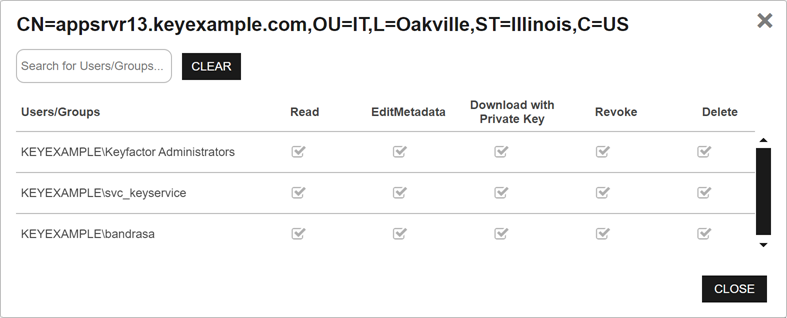
Figure 47: Certificate Operation: Identity Permissions
 Remove from Certificate Store
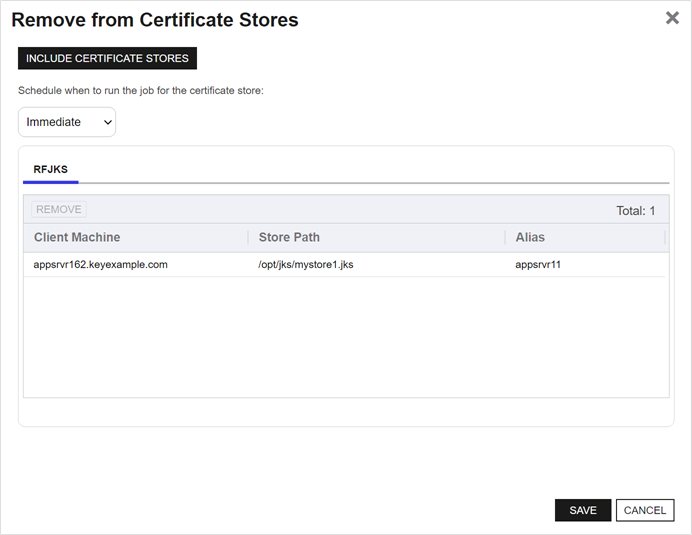
Click Remove from Certificate Store in the right-click menu to remove the selected certificate from a certificate store or stores. Two dialog boxes will pop up as per Add to Certificate Store allowing you to select the certificate store(s) from which you wish to remove the certificate. In the first dialog, select the certificate store from which you want to remove the certificate and click the Include and Close button and then click Save in the second dialog. Only certificate stores that contain the certificate and to which the user has permissions will be shown.
Permissions for certificates and certificate stores can be set at either the global or certificate collection and certificate store container level. You can use a mixture with, for example, global certificate permissions and container-level certificate store permissions. See Certificate Collection Permissions and Container Permissions for more information about global vs collection and container permissions.
 Renew
Renew
Click Renew in the right-click menu to renew or re-issue the selected certificate.
Permissions for certificates and certificate stores can be set at either the global or certificate collection and certificate store container level. You can use a mixture with, for example, global certificate permissions and container-level certificate store permissions. See Certificate Collection Permissions and Container Permissions for more information about global vs collection and container permissions.
The renewal dialog includes the options:
-
One-click renewal (the Continue option), which supports renewal with no further user interaction. If you wish to use One-Click Renewal for certificates, the Allow One-Click Renewals option must be enabled in both the templates and CAs to which you want One-Click Renewal to apply (see Certificate Template Operations and Adding or Modifying a CA Record). When a certificate requires approval, a message will show after a successful one-click renewal: The certificate renewal has been completed successfully and is pending approval, otherwise, a success message will display.
-
Seeded PFX enrollment (the Configure option), to be redirected to the PFX Enrollment page with the information for the certificate pre-populated in the enrollment fields. The Continue option is only available if either one of the following is true:
- The certificate is located together with its private key in one or more managed certificate store(s).
- The certificate was enrolled with a template that has been configured in Keyfactor Command to allow private keys to be encrypted and stored in the Keyfactor Command database (see Certificate Template Operations).
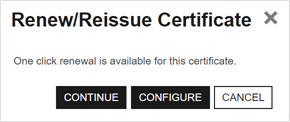
Figure 49: Certificate Operation: Renew/Reissue with the Continue Option
From the seeded PFX Enrollment page, you can change the CA or template for enrollment, change the subject information or metadata for the certificate, set or remove SANs, or change the certificate store(s) to which the renewed certificate will be distributed. To change the certificate store(s) for distribution, on the PFX Enrollment page, scroll down to the Certificate Delivery Format section and click the Include Certificate Stores button. This will open the Select Certificate Store Locations dialog. For more information, see Add to Certificate Store and PFX Enrollment.
Certificates issued by Microsoft CAs will be renewed (meaning the certificate will be issued with a different private key) regardless of how recently they were issued. Certificates issued by other certificate authorities will be renewed (typically retaining the same private key but with a new expiration date) if they are within the renewal window specified by the certificate template and re-issued (retaining the same expiration date) if they are not yet within the renewal window.
 Revoke
Select one or more certificates in the results grid and then click Revoke to revoke the selected certificate(s). When you select revoke, a dialog box pops up prompting for the effective revocation date, the reason for the revocation (for which there are dropdown choices), and comments (required). Click Save to execute, or Cancel. After executing a revoke, a confirmation dialog displays a messages and the options to proceed (OK) or Cancel.
Upon completion of the revocation, the CRL![]() A Certificate Revocation List (CRL) is a list of digital certificates that have been revoked by the issuing Certificate Authority (CA) before their scheduled expiration date and should no longer be trusted. for the CA in question is immediately republished to reflect the revocation. Unless you choose the revocation reason of Certificate Hold, there is no way to undo a revoke so care should be taken with this operation.
A Certificate Revocation List (CRL) is a list of digital certificates that have been revoked by the issuing Certificate Authority (CA) before their scheduled expiration date and should no longer be trusted. for the CA in question is immediately republished to reflect the revocation. Unless you choose the revocation reason of Certificate Hold, there is no way to undo a revoke so care should be taken with this operation.
Permissions for certificates can be set at either the global or certificate collection level. See Certificate Collection Permissions for more information about global vs collection permissions.
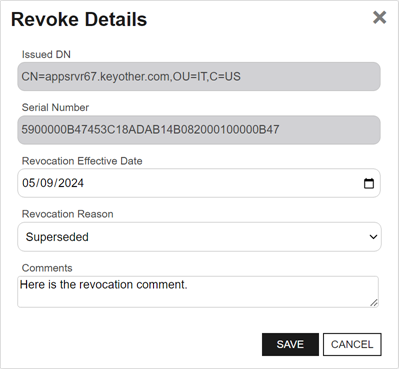
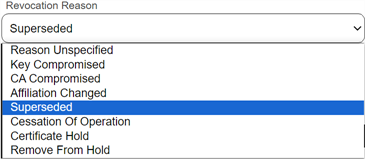
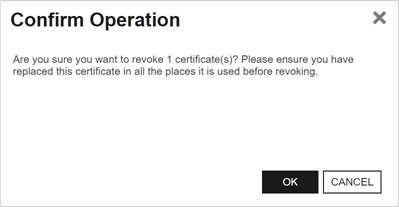
Figure 50: Certificate Operation: Revoke
 Revoke: Certificate Hold / Remove from Hold
If you would like to suspend one or more certificates without permanently revoking them, select one or more certificates in the results grid and then click Revoke at the top of the grid or Revoke on the right-click menu. Select Certificate Hold as the revocation reason. You will be required to add a comment in the Comments field to Save the record change.
When you Revoke a certificate using the revocation reason of Certificate Hold, the certificate is in the revoked state, with the revocation reason of Certificate Hold. You will only be able to see the certificate on a certificate search with Include Revoked checked. To return the certificate to the Active state, Revoke it again with the reason Remove from Hold. You will be required to add a comment in the Comments field to Save the record change.
Permissions for certificates can be set at either the global or certificate collection level. See Certificate Collection Permissions for more information about global vs collection permissions.
 Revoke All
If you would like to revoke ALL the certificates in the current query results set, click Revoke All at the top of the grid. The button appears active only if no certificates are selected on the grid.
When you select revoke all, a dialog box pops up prompting for the effective revocation date, the reason for the revocation (for which there are dropdown choices), comments (required), and confirmation of the number of certificates being revoked. In the confirmation field, you must type the suggested message, which includes the number of certificates being revoked, exactly as indicated, including case (e.g. “REVOKE 52” not “revoke 52”).
If any certificates fail revocation, their certificate IDs will be listed in a dialog at the completion of the revocations.
Upon completion of the revocations, the CRL(s) for the CA(s) in question is immediately republished to reflect the revocations. Unless you choose the revocation reason of Certificate Hold, there is no way to undo a revoke so care should be taken with this operation.
A maximum of 1000 certificates can be revoked at once with this option. If the query contains more certificates than this, a warning dialog will appear and you will not be allowed to continue with the revocation.
Permissions for certificates can be set at either the global or certificate collection level. See Certificate Collection Permissions for more information about global vs collection permissions.
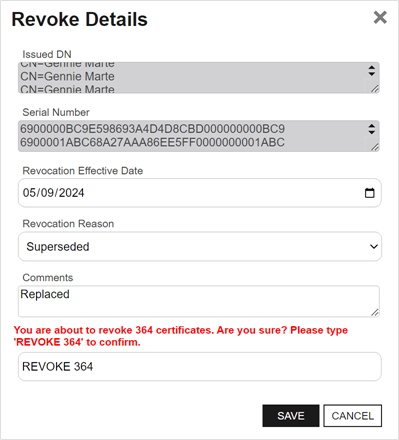

Figure 51: Certificate Operation: Revoke All
